
Here is the pattern as promised. Please tell me if you don't understand it or I have got something wrong. Also I would love to see anyones creations from this pattern. Please send me pics if you can.
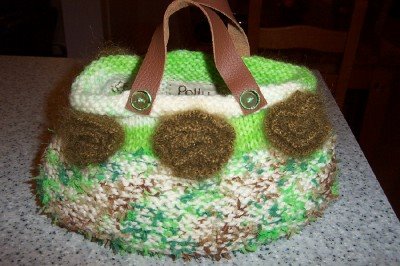
Camofleur
Materials
1 x 50g ball aran weight yarn for main part
1 x 50g ball aran weight for top part (I dyed with koolaid ½ and ½ )
1 x 50g ball Bergeres de France Papillion (www.begeredefrance.fr/.)
1 x 25g ball Rowan Kidsilk Haze
4 buttons
Strips if leather for handles
Circular needles US 9 5.5mm (approx 16” cord + needles)
US 7 (4.5mm) needles straight or circular
Instructions
Main Part:
Using one strand of aran and 1 strand of Papillion held together.
Cast on 35 sts
Knit 1 row
Purl 1 row
Knit into front and back of all stitches (70 sts)
Stocking Stitch for 2 ½” ending with a knit row
Joining to form a circle *K 2, K into front and back of next st, repeat from * to last 2 sts, K2.
Knit for 6 ½“.
Change to top wool colour
P2tog P2 to last st P1.
Purl for3”
Cast off.
With smooth (knit) side out stitch side opening together. Fold the base opening together and stitch along edge. Turn right side out (with purl side of stocking stitch outside)
Let the top of the bag roll over to form brim.
Flowers make 6
Using Size US 7 (4.5mm) needles and Kidsilk Haze
Cast on 180sts
Row 1: K1 *K2, pass first stitch over second stitch, repeat from * to last st, K1
Row 2: P2tog to end
Row 3: K to end (43sts)
Cast off.
Roll the flower up to create a rose shape and stitch together. Stitch to bag
Handles
Cut two strips of leather for handles and stitch to bag using vintage buttons to decorate.
To line the bag lay it out flat and cut out the lining fabric the same shape with fold at bottom of bag and a seam allowance of ½”.
Stitch side seams with right sides together.
Put into bag and fold down the top of the lining so that it fits just below the line where you started the top part of knitting. (if there is excess fabric just pleat it to fit)
Slip stitch to the bag.
Put a couple of stitches through the base corners to hold the lining down.
Enjoy!
No comments:
Post a Comment